7. Run Jobs on Yen GPU nodes
GPU Nodes Overview
The Yen-slurm has three GPU nodes:
yen-gpu1node with 64 threads, 256 G of RAM and 4 A30 NVIDIA GPUsyen-gpu2node with 64 threads, 256 G of RAM and 4 A40 NVIDIA GPUsyen-gpu3node with 64 threads, 256 G of RAM and 4 A40 NVIDIA GPUs
The A30 NVIDIA GPUs have 24 G of GPU RAM while the A40 NVIDIA GPUs have 48 G of GPU RAM per GPU.
Slurm GPU Partition
The yen-slurm cluster has a gpu partition to run jobs on the GPU nodes. See its timelimit with:
$ sinfo -p gpu
PARTITION AVAIL  TIMELIMIT  NODES  STATE NODELIST
gpu          up 1-00:00:00      3   idle yen-gpu[1-3]
There is a limit of 1 day runtime and 4 GPUs per user.
See partition limits with:
$ sacctmgr show qos
Constraining My Job to Specific Nodes using Node Features
Certain nodes may have particular features that your job requires, such as a GPU. These features can be viewed as follows:
USER@yen4:~$ sinfo -o "%20N  %5c  %5m  %64f  %10G"
NODELIST              CPUS   MEMOR  AVAIL_FEATURES                                                    GRES
yen[11-18]            32+    10315  (null)                                                            (null)
yen-gpu1              64     25736  GPU_BRAND:NVIDIA,GPU_UARCH:AMPERE,GPU_MODEL:A30,GPU_MEMORY:24GiB  gpu:4
yen-gpu[2-3]          64     25736  GPU_BRAND:NVIDIA,GPU_UARCH:AMPERE,GPU_MODEL:A40,GPU_MEMORY:48GiB  gpu:4
For example, to ensure that your job will run on a node that has an NVIDIA Ampere A40 GPU with 48 G of GPU RAM, you can include the -C/--constraint option to the sbatch command or in an sbatch script.
Here is a trivial example command that demonstrates this: sbatch -C "GPU_MODEL:A30" -G 1 -p gpu --wrap "nvidia-smi"
This will get yen-gpu1 node allocated (since it’s the only one with A30 NVIDIA GPU) and will then print out the nvidia-smi output to a file.
At present, only GPU-specific features exist, but additional node features may be added over time.
Python GPU Example
This example demonstrates how to run a short Python example using PyTorch or Keras for deep learning training. CUDA 12.1, PyTorch and Tensorflow/Keras are installed already so you do not have to install them yourself.
PyTorch Example
To use PyTorch, you simple load the pytorch module which makes pytorch venv available and run the training example.
$ ml pytorch
When you load this module, you will be in a venv running Python 3.10 that has pytorch and other AI packages installed.
You can check with:
$ which python
/software/free/pytorch/2.1.2/bin/python

$ python --version
Python 3.10.12
List packages installed in pytorch venv:
$ pip list
Package                   Version
------------------------- ---------------
accelerate                0.26.1
aiohttp                   3.9.3
aiosignal                 1.3.1
arrow                     1.3.0
asttokens                 2.4.1
async-timeout             4.0.3
attrs                     23.2.0
boto3                     1.34.30
botocore                  1.34.30
bravado                   11.0.3
bravado-core              6.1.1
certifi                   2023.11.17
charset-normalizer        3.3.2
click                     8.1.7
comm                      0.2.1
contourpy                 1.2.0
cycler                    0.12.1
datasets                  2.16.1
debugpy                   1.8.0
decorator                 5.1.1
dill                      0.3.7
evaluate                  0.4.1
exceptiongroup            1.2.0
executing                 2.0.1
filelock                  3.13.1
fonttools                 4.47.2
fqdn                      1.5.1
frozenlist                1.4.1
fsspec                    2023.10.0
future                    0.18.3
gitdb                     4.0.11
GitPython                 3.1.41
huggingface-hub           0.20.3
idna                      3.6
imageio                   2.33.1
ipykernel                 6.29.0
ipython                   8.20.0
isoduration               20.11.0
jedi                      0.19.1
Jinja2                    3.1.3
jmespath                  1.0.1
joblib                    1.3.2
jsonpointer               2.4
jsonref                   1.1.0
jsonschema                4.21.1
jsonschema-specifications 2023.12.1
jupyter_client            8.6.0
jupyter_core              5.7.1
kiwisolver                1.4.5
lazy_loader               0.3
lightning-utilities       0.10.1
MarkupSafe                2.1.4
matplotlib                3.8.2
matplotlib-inline         0.1.6
monotonic                 1.6
mpmath                    1.3.0
msgpack                   1.0.7
multidict                 6.0.4
multiprocess              0.70.15
neptune                   1.8.6
nest-asyncio              1.6.0
networkx                  3.2.1
numpy                     1.26.3
nvidia-cublas-cu12        12.1.3.1
nvidia-cuda-cupti-cu12    12.1.105
nvidia-cuda-nvrtc-cu12    12.1.105
nvidia-cuda-runtime-cu12  12.1.105
nvidia-cudnn-cu12         8.9.2.26
nvidia-cufft-cu12         11.0.2.54
nvidia-curand-cu12        10.3.2.106
nvidia-cusolver-cu12      11.4.5.107
nvidia-cusparse-cu12      12.1.0.106
nvidia-nccl-cu12          2.18.1
nvidia-nvjitlink-cu12     12.3.101
nvidia-nvtx-cu12          12.1.105
oauthlib                  3.2.2
packaging                 23.2
pandas                    2.2.0
parso                     0.8.3
pexpect                   4.9.0
pillow                    10.2.0
pip                       23.3.2
platformdirs              4.1.0
prompt-toolkit            3.0.43
psutil                    5.9.8
ptyprocess                0.7.0
pure-eval                 0.2.2
pyarrow                   15.0.0
pyarrow-hotfix            0.6
Pygments                  2.17.2
PyJWT                     2.8.0
pyparsing                 3.1.1
python-dateutil           2.8.2
python-dotenv             1.0.1
pytorch-lightning         2.1.3
pytz                      2023.4
PyYAML                    6.0.1
pyzmq                     25.1.2
referencing               0.33.0
regex                     2023.12.25
requests                  2.31.0
requests-oauthlib         1.3.1
responses                 0.18.0
rfc3339-validator         0.1.4
rfc3986-validator         0.1.1
rpds-py                   0.17.1
s3transfer                0.10.0
safetensors               0.4.2
scikit-image              0.22.0
scikit-learn              1.4.0
scipy                     1.12.0
seaborn                   0.13.2
setuptools                69.0.3
simplejson                3.19.2
six                       1.16.0
smmap                     5.0.1
stack-data                0.6.3
swagger-spec-validator    3.0.3
sympy                     1.12
threadpoolctl             3.2.0
tifffile                  2024.1.30
tokenizers                0.15.1
torch                     2.1.2
torchmetrics              1.3.0.post0
torchvision               0.16.2
tornado                   6.4
tqdm                      4.66.1
traitlets                 5.14.1
transformers              4.37.2
triton                    2.1.0
types-python-dateutil     2.8.19.20240106
typing_extensions         4.9.0
tzdata                    2023.4
uri-template              1.3.0
urllib3                   2.0.7
wcwidth                   0.2.13
webcolors                 1.13
websocket-client          1.7.0
wheel                     0.42.0
xformers                  0.0.23.post1
xxhash                    3.4.1
yarl                      1.9.4
If you need additional packages installed, you can pip install them to your ~/.local since this global pytorch venv is not user writable.
The PyTorch example script uses the MNIST dataset for image classification, and consists of a simple fully connected neural network with one hidden layer.
We will run the mnist.py script on the GPU node.
Submit Slurm script
Change the submission script, train-gpu.slurm, to include your email.
This script is asking for one GPU on the gpu partition and 10 CPU cores on GPU node for 1 day.
Submit the job to the gpu partition with:
$ sbatch train-gpu.slurm
Monitor your job:
$ squeue -u $USER
You should see something like:
$ squeue -u nrapstin
            JOBID PARTITION     NAME     USER ST       TIME  NODES NODELIST(REASON)
            190526       gpu train-gp nrapstin  R       0:25      1 yen-gpu1
Once the job is running, connect to the node where the job is running:
$ ssh yen-gpu1
Once you connect to the GPU node, monitor GPU utilization:
$ watch nvidia-smi
You should see that one of the four GPUs is being utilized (under GPU-Util column) and the process running on the GPU is python:
Wed Jun 26 12:16:41 2024
+-----------------------------------------------------------------------------------------+
| NVIDIA-SMI 550.90.07              Driver Version: 550.90.07      CUDA Version: 12.4     |
|-----------------------------------------+------------------------+----------------------+
| GPU  Name                 Persistence-M | Bus-Id          Disp.A | Volatile Uncorr. ECC |
| Fan  Temp   Perf          Pwr:Usage/Cap |           Memory-Usage | GPU-Util  Compute M. |
|                                         |                        |               MIG M. |
|=========================================+========================+======================|
|   0  NVIDIA A30                     Off |   00000000:17:00.0 Off |                    0 |
| N/A   35C    P0             31W /  165W |     1073MiB / 24576MiB |      3%      Default |
|                                         |                        |             Disabled |
+-----------------------------------------+------------------------+----------------------+
|   1  NVIDIA A30                     Off |   00000000:65:00.0 Off |                    0 |
| N/A   33C    P0             31W /  165W |       1MiB /  24576MiB |      0%      Default |
|                                         |                        |             Disabled |
+-----------------------------------------+------------------------+----------------------+
|   2  NVIDIA A30                     Off |   00000000:CA:00.0 Off |                    0 |
| N/A   32C    P0             29W /  165W |       1MiB /  24576MiB |      0%      Default |
|                                         |                        |             Disabled |
+-----------------------------------------+------------------------+----------------------+
|   3  NVIDIA A30                     Off |   00000000:E3:00.0 Off |                    0 |
| N/A   34C    P0             29W /  165W |       1MiB /  24576MiB |      0%      Default |
|                                         |                        |             Disabled |
+-----------------------------------------+------------------------+----------------------+

+-----------------------------------------------------------------------------------------+
| Processes:                                                                              |
|  GPU   GI   CI        PID   Type   Process name                              GPU Memory |
|        ID   ID                                                               Usage      |
|=========================================================================================|
|    0   N/A  N/A   3927692      C   python                                       1070MiB |
+-----------------------------------------------------------------------------------------+
nvidia-smi also tells you how much GPU RAM is used by the process. When training LLM or other models, it’s important to fully utilize the GPU RAM so that the training is optimized. So if the GPU has 24 G of RAM, we can adjust the batch size to use as much data as fits into the GPU RAM and monitor nvidia-smi output so see how much RAM is used while the job is running. If the batch size is too large, your job will crash with OOM error. Reduce the batch size then try again (while monitoring GPU memory usage).
In the output example above, we are way under-utilizing the GPU RAM (using only 1 G out of 24 G).
Once the job is done, look at the output file:
$ cat out/train-gpu*.out
The output should look similar to:
[1] loss: 0.553
[2] loss: 0.265
[3] loss: 0.210
[4] loss: 0.175
[5] loss: 0.149
[6] loss: 0.129
[7] loss: 0.114
[8] loss: 0.101
[9] loss: 0.091
[10] loss: 0.083
Accuracy on the test set: 97 %
Make PyTorch into a Jupyter Kernel
We can also add this environment to the interactive Yen’s JupyterHub. Note that even though PyTorch will fall back to the CPU if GPU is not available, deep learning and machine learning is much more efficient on GPU than CPU so you should not use the interactive yens for model training but use the notebooks for visualization or other pre- or post-training tasks.
Load pytorch module:
$ ml pytorch
List all available kernels:
$ jupyter kernelspec list
Load pytorch module and make venv into a JupyterHub kernel:
$ python -m ipykernel install --user --name pytorch212 --display-name 'PyTorch 2.1.2'
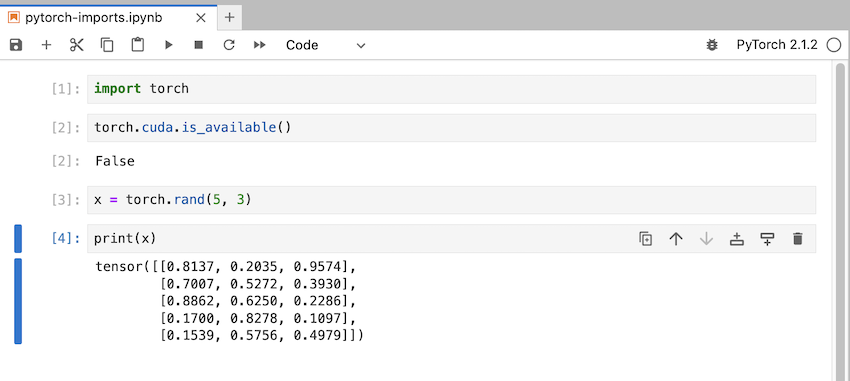
Launch JupyterHub and click on Launcher to see a new PyTorch 2.1.2 notebook kernel you can start up.
Once you start up the notebook, make sure you can import torch but CUDA is not available (since interactive yens do not have GPUs).
The Yens also have prebuilt tensorflow module that can be used in a similar way to pytorch.